
Have you been wanting to get started with selling on Amazon, but you’re not really sure how to start? I can 100% relate to this feeling.
Odds are that you probably already buy products online from Amazon. The platform receives over 2 billion website visitors monthly, and ~1 billion is retail sales daily. But did you know that over half of these sales come from 3rd party sellers?
Whether you want to sell wholesale, private-label, or arbitrage products, there’s room for everyone to jump on board on the Amazon platform!
So if you’re ready to take the first step in starting a successful Amazon reselling business, then keep reading to learn exactly how to successfully set up your seller account. Or check out this video for a step-by-step guide.
10 EASY STEPS TO OPENING UP AN AMAZON SELLER ACCOUNT
Click here to take you to the seller application
Step 1: Choosing your account type
The first thing you’ll need to decide is which of the two account types you’d like to open. You can choose between an individual plan, or a professional plan. But don’t fret over which one to choose because you aren’t locked into this plan. At any time, if you’d like to change your account type you are able to easily do so.
Professional Plan:
This plan will cost you $39.99/monthly. However, it is the plan that we will recommend that you go with! This is the ideal plan for a number of reasons. The first reason is you will be eligible for the Amazon FBA (fulfilled by Amazon) program. With this program you will send your inventory into Amazon for them to store in their warehouses, ship to the customers, and even handle all of the customer service. If this isn’t enough to sell you on this plan you’ll also be opened up to more categories that you can list and sell in. Additionally, if you plan on running any campaigns on your products, you’ll only be able to do so with the professional plan.
Individual Plan:
This plan will not cost you a monthly fee, however it will charge you .99 for each item that you sell. Some quick math will tell you that if you plan on selling over 40 items each month anyways, then the Professional plan is a no-brainer.
Step 2: Email and Mobile #
The first thing that you’ll need is a valid email address. If you already have an Amazon account set up, then you could use this same email. However, if you’d prefer to keep pleasure and business separate, then this is the time to set up an email account specifically for your business.
Next you’ll be asked to input your mobile phone number. Amazon will immediately send you a OTP (one time pin) that you’ll need to enter.
Step 3: Business Location and Business Type
First you will choose the country in which your business is located. Next, from the drop-down box you’ll choose your business type.
- State-owned business
- Publicly-owned business
- Privately-owned business
- Charity
- None, I am an individual
If you’re confused by these options, then you’re probably going to go with the “None, I am an individual” option. This business type is for those who want to sell wholesale, or arbitrage items. Arbitrage is simply the art of taking advantage of price differences across markets. You’re finding items for lower, and reselling them for higher (think buy low, sell high!)
The other option that you may fall under is the “Privately-owned business”. This is for individuals who plan to private label items. This means you’re finding manufacturers to produce generic items, that you will then put your own label and brand on.
The other options are less-likely to apply to you. If your company is state-owned or a charity then you will choose those options. The publicly owned or listed business just means it is a giant company.
Step 4: Company Registration
Now you’ll need to enter in your EIN (employer identification number). This is a 9-digit number that is assigned for your business by the IRS. If you don’t have an EIN you can apply and receive one in minutes by going to IRS.gov. You may also choose to use your social security number here instead.
Next you’ll enter your business address and phone number. If you don’t have a separate location where you run your business, then it is completely fine to use your residential address and personal phone number.
Step 5: Seller Info
Here you will enter in your citizenship, country of birth, date of birth, residential address, and phone number.
Step 6: Payment Info
For this step you’ll need to have a valid bank account number. If you are outside of the USA, you can set up a bank account at websites like payoneer.com. You may choose to use your personal bank account credentials here, but we would recommend that you set up a business banking account. It is just going to make your life a lot easier in the long-run to keep all of your business finances together in one place. You can take your LLC, or DBA paperwork right to your local bank to set up a business account.
From the drop-down box choose your financial institution’s name. If you don’t see it listed, then scroll all the way down and choose “other” to type in your financial institution. Now you’ll need to enter in your routing and bank account numbers. This is so that Amazon knows where to pay you your money (cha-ching).
Step 7: Billing Info
For this step you’ll be asked to enter in a credit card. It is super important here that you do not use a debit card, prepaid card, or anything else other than a credit card. Amazon needs this card on file so that they can collect any charges from you that you may incur. Typically this is your account fees and FBA fees.
Step 8: Store Name
Now it’s time for some fun! What will you choose to name your storefront? Now don’t get stuck here for too long… the name that you choose can be changed at any time. But some ideas to think about when choosing your store’s name. If you have a specific brand, your store’s name does not need to be the same name as your brand. Generally it’s a great idea to choose a name that is broad and generic. Especially if you plan to sell across a lot of different categories. Unless you’re only coming to Amazon to sell one specific item, then you might choose to make that item your store’s name. Or, if you are only staying in one specific niche then you may want to incorporate that into your name. For example, if you only plan to sell pet supplies, then you might want your name to specifically mention pet supplies.
On this same page you will be prompted to answer some “yes/no” questions.
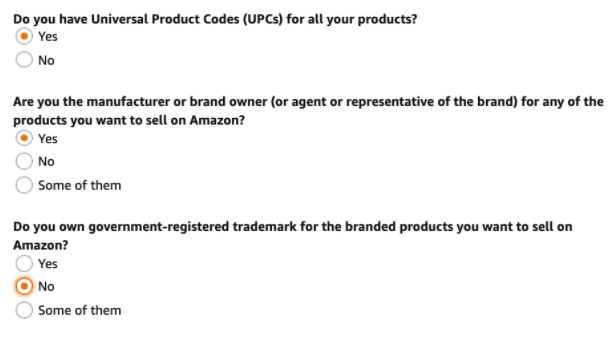
UPCs are universal product codes. These are the barcodes that come on every product that you buy from anywhere. If you are selling arbitrage then all of your products will already have UPC codes on them. However, if you plan to private label then you will need to purchase UPC codes for all of your products from GS1.org. Next you’re asked if you are the manufacturer or brand owner. This again will apply to you if you private label.
For the trademark section, you don’t need to have any special trademarks for your business. However if you private label, then you might want to consider getting yourself a trademark. You’ll also be able to enter any diversity certifications on this page that you may have (women-owned business, veteran, etc.).
Step 9: Upload Documents
For this final step you will need a valid passport or driver’s license. Be sure that when you upload these photos that they are crystal clear and not grainy looking at all. If there is any question in the clarity, then Amazon will not accept these documents after reviewing them and you’ll need to take new photos, which will significantly hold up the process.
If your bank was not automatically verified, then you’ll also be prompted to upload a bank statement. Again, make sure that the statement is crystal clear if you’re taking a photograph. It is best to log in to your bank account online, and download a pdf of your most recent transactions to upload instead.
Now go ahead and submit your application!!
Step 10: Additional Documents and Verification Call
Sometimes Amazon may ask you for a utility , or send you a code in the mail to verify your residency. You’ll lastly need to sign up for a verification phone call with Amazon. Don’t worry too much here, the call is super fast, easy, and painless. In total, it takes roughly 10 minutes so long as you’ve uploaded everything correctly. A representative from Amazon will get on a video call with you to verify your documents. They will also ask you to hold up your identification so that they can see the ID matches your face, and you are who you say you are.
And that’s it!! Congratulations on taking the first step in growing your profitable Amazon business. E-commerce is growing exponentially at an increasing pace. There’s no better time than right now to take advantage of this growing opportunity!
If you have any more questions about how to open up your Amazon Selling Account, let us know in the comments!